Showing posts with label DIY. Show all posts

"My Favorite Drink" Coasters

During the Summer, I visited a Habitat for Humanity ReStore with my mom to find some great odds and ends to craft with. I love ReStore because there are so many materials, from tiles to toilets, and fan blades to furniture. ReStore is a non-profit home improvement store and donation center that sells materials at a fraction of retail price. All the proceeds go to building homes in different communities all around the world!

While, shopping, I found ceramic tiles. There are tons of different sizes. From 5"x5" to 12"x12", even 1"x1". White, black, tan, red, blue, or green. There were so many to choose from! Since I didn't know what to do with them yet, I just grabbed a bunch. They ranged from 10 cents each to 50 cents each. A great bargain! 

After having these tiles in my room for a while, I finally figured out what to do with them. Coasters, starring different drinks! 
What I used:
Ceramic tiles
Cardboard beer/soda boxes
Mod Podge & a paintbrush
Xacto blade or box cutter
Felt dots
Ruler & cutting board

Here are the steps!
1. Start by picking out your favorite drinks to use. Cut them out in squares using the ruler and xacto knife. I made my cardboard pieces slightly smaller than the ceramic tile, so I could still see part of the edge of the tile once I finished.
2. Spread the Mod Podge on the surface of the tiles, and place your square of cardboard centered on top of it.
3. Let the cardboard sit on top of the Mod Podge and tile for about 10 minutes. I like to place a heavy book on top of them so they keep their place better. Then, spread the Mod Podge on top of the cardboard. Make sure to get the edges where the cardboard meets the tile. That will help it be a permanent fix!
4. Wait until the surface dries (about 45 minutes to be safe). Then, flip over the tiles, and put sticky felt dots on each corner. Those will help you move the coaster across the table better. 
And that is all! This is such a fun and easy project to do for yourself, but especially as a gift for someone. Find out their favorite drink, and you can make them a coaster to match!

If you're interested in purchasing any coasters, please don't hesitate to contact me! These are not up on Etsy at the moment because I am in a craft show coming up, and will be selling them there. But if you would like a set, comment below, or email me at kellykurkjian@gmail.com.

Enjoy!

DIY "I Love You Because" Signs

This summer, I went to two weddings for two very good friends of mine. Since I love crafting, I decided to make presents for them instead of buy them something for their registry. This project is an "I Love You Because" sign that families and couples could hang up in their house. It is such a cute place to leave notes for your other half! I got this project idea from my mom. She helped me a bunch in learning how to do it. She is such an incredible crafter!

What I used:
Wood boards
Chalkboard spray paint
White chalk
A rag
Electric sander/sandpaper
Silhouette machine (to cut vinyl)

Here are the steps!
1. Spray paint the boards using chalkboard spray paint. Do light, multiple layers. Don't overdo the coats because it could leave puddles, drip, or take a long time to dry.
2. Once they are dry, rub the entire piece of wood using the side of a piece of chalk. Cover the entire board that you plan on writing on eventually. What you are doing is priming the surface to be written on with chalk. 
3. Using the rag, rub all the chalk in to prime the surface. Then, wipe it all off.

4. Using a Silhouette machine, cut out "I Love You Because" letters. You can also use letter stickers from a craft store, or cut them out using a Cricut machine. Which ever you has access to!
5. To add a little shabby look to the side, I used an electric sander and sanded the edges of the sign, so there wasn't a hard edge. You can also use sandpaper to get this affect, it just may take longer.
6. Once you are done creating the sign, add a frame hanger to the back so you can mount it up on your wall. All done!

I sent this sign to my friends Willy & Alexa for their wedding, and they sent me a picture back! Couldn't be happier that they love their new gift!


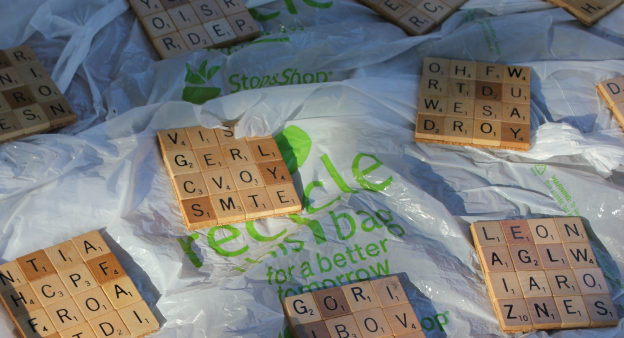
DIY: Scrabble Coasters

I am starting to get ready for a craft show I am in in November, and these Scrabble coasters were one of the first things I wanted to do! I've seen these all over Pinterest, and I had to make some for myself. Luckily, my mom has a ton of scrabble pieces, thanks for our auction trips and eBay finds. 


What I used:
Scrabble tiles
Acrylic Coating spray
Ruler
Mod Podge 
Paintbrush
Exacto knife or box cutter
Cork board

The steps are very easy.
1. Cut the cork into 4x4 squares. Put Mod Podge on the square, and place 4x4 (16) tiles on the square. I put a book on top after I glued them on to solidify their place.
2. After about 10 minutes, take the book off, and add a layer of Mod Podge on top of the tiles. Wait until it is dry, and add another layer. Too many layers never hurt, the more layers the better!


3. After they are all dry, use the ruler and the exacto knife to cut off the excess cork on the sides.
4. Then, spray the Acrylic Coating on the coasters. Let dry, and apply another coat. This leaves a waterproof, shiny coating on the surface. Done!


It is also fun sometimes to put in secret words! For this set, I included my friends, Willy & Alexa's name in them as a fun wedding gift. 

Love these a bunch, but aren't able to make them? 
Contact me at kellykurkjian@gmail.com and we can chat!

That was easy! Hope you enjoyed!

DIY: Refurbished Brass Lamp Project

About four months ago, I moved from Maryland to Stamford for my first job out of college. Moving out is exciting, but so complicated. There are a lot of expenses when you are trying to furnish a place. So much furniture and decorations. So the best thing to do is to find old pieces, and refurbish them to fit the needs of your new place!

Great places to find these old pieces are at fun auctions, garage sales, estate sales, and thrift stores. You will see pieces that are kind of ugly...but you must see past that, and see what the piece can become!

The first piece I want to show are two refurbished lamps my mom and I made.

What we used:
Two old, brass lamps
Sandpaper
Soap & Water
Scissors
Painters Tape
Outdoor/Indoor spray paint
Lots of scrap fabrics


We started by cleaning the lamps with soap and water to get as much dirt and junk off of the old brass lamps. Then, we used sandpaper all over the lamps to smooth out the surface, and to help get rougher dirt off. In this process, you want as smooth as a surface possible so the spray paint lays on smoothly!

Next, we covered all the places on the lamp that we didn't want to get spray painted. For this particular lamp, we covered where the bulb sits. Then, we started to spray. I recommend you lay down a very large sheet. When you spray, the paint goes farther than you think! Spray the lamp in multiple coats over time. Don't try to completely cover the lamp in the first attempt. This will cause drips because the paint is too thick. Take your time!

Next, cut the first layer of the lamp shade off so you can work with the wire frame. Then, cut LOTS of strips of fabrics. Start by tying a knot on a wire, and start wrapping it around the frame. When the fabric comes to an end, tie it to another piece of fabric to continue around the lampshade.


And ta-da! A beautiful, unique new lampshade! This project was intensive, but they are both statement pieces now in my new apartment. They get a lot of attention!

Hope you enjoyed!